Subscribe RSS

Sunday

Pear Muffins

I love pears, but they're never ripe when you buy them, and they seem to take so long to ripen.  Half the time I totally forget about them until they're overripe, and then I feel guilty for throwing them out.  The last time this happened I decided to try using them to make muffins and it worked!  The spices weren't quite right, but on the second try they came out tasting the way I had hoped.  So.....next time you have overripe pears, or are just craving something warm and sweet, try these.  I think you'll be pleasantly surprised.

Pear Muffins

1 cup fully ripe or overripe pears (about 2 medium) cored, peeled, and mashed (a pastry blender works well for mashing)
2 eggs
1/3 Cup granulated sugar
1/2 Cup oil
1/2 Cup golden raisins (optional)
Combine above ingredients in large bowl and mix well.  In a smaller bowl combine:
1-3/4 Cups Four Flour Bean Mix
1/2 tsp xanthan gum
1 tsp baking powder
1 tsp baking soda
1/4 tsp salt
1/4 tsp ground nutmeg

Preheat oven to 400.  Grease 12 muffin tins.  Add dry mixture to wet mixture and stir together until mixed.  Do not overbeat.  Spoon into prepared pans.  Bake for 15-20 minutes.  Remove from pans and cool on rack.  Makes 12 muffins.


Monday

No. 1 Caramel Corn

No. 1 is kind of a play on words, because each of the ingredients and the instructions has 1 in it, which makes it easy to remember in case you want to make some when you're at a friend's house and don't have your recipe with you :).  It's also a wonderful ooey, gooey totally yummy caramel sauce that doesn't sugar or go hard by the next day if you happen to have some left over, which isn't likely, and that you can also use as a dipping sauce for cut up fruit if you don't want to pour it over popcorn or make popcorn balls.  It's No. 1 at our house!  Hope it'll be No. 1 for you too!

No. 1 Caramel Corn

1 lb. (2-1/3 Cups) brown sugar
1 cube (1/2 Cup) butter
1 can sweetened condensed milk
1 Cup light corn syrup

Mix all ingredients in a saucepan over medium heat and bring to a boil, stirring constantly.  Boil for 1 minute.  Pour over approximately 3 gallons of popped corn. 


Remember those big old Tupperware bowls.  I still have mine (they last forever) and 3 gallons filled two of them with enough room to stir.  Just pour about half of the caramel sauce over each bowl and stir.  I also have a giant stainless steel bowl that I use for canning that all of the popcorn would fit in, but I found it easier to stir it into the popcorn and get it evenly coated in the smaller bowls.


To form the popcorn balls, though, I went ahead and poured the contents of the smaller bowls into the bigger bowl, buttered up my hands, and dived in.


Be sure you have some room temperature butter nearby when forming the popcorn balls, so you can butter up your hands often.  One recipe makes 16 big popcorn balls.


For you sharp-eyed readers who will notice that there are only 15 popcorn balls on the cookie sheet, that's because my husband snagged one to eat before I could get the picture taken :)  Enjoy!


Wednesday

Chocolate Chip Oatmeal Cake

Seems like forever since I've posted on this blog.  Apologies to my faithful readers.  My mom and mother-in-law (93 and 90 respectively) have both been through a long rough patch, but are both doing better now, so back to cooking!  I adapted this recipe from a recipe I got from my friend Gail (of the Gail's Green Beans fame).  She brought this cake to a party we attended and I loved it!  It's a snack cake -- so no frosting is needed (call me crazy, but I've never been a fan of frosting).  You can drizzle it with chocolate sauce or sprinkle it with powdered sugar, if you like, or you can serve it up my favorite way -- with Magic Vanilla Ice Cream on top, drizzled with Hot Fudge Sauce.  Yummmm.....decadence at its best!


This cake also transports well, which makes it a great picnic cake for all your summer outings.  Hope you enjoy it as much as we have!

Chocolate Chip Oatmeal Cake

1 Cup Bob's Red Mill Gluten Free Old Fashioned Rolled Oats (see note below)
1 stick butter (1/2 cup)
1-3/4 Cups water
Put in a large bowl and microwave for 4 minutes on high.  Remove from microwave and cover to steam while doing the next two steps.
1 Cup brown sugar
1 Cup white sugar
2 eggs, whisked
Mix sugars and eggs together.
1 tsp xanthan gum
1 tsp baking soda
1/2 tsp salt
3 Tbsp cocoa powder
Whisk dry ingredients together. 
10 oz. chocolate chips (I use semi-sweet)
Add chocolate chips to the flour mixture and stir to coat the chocolate chips.  This keeps the chips from sinking to the bottom of the batter when baking (great hint Gail -- thank you!)

Now take the cover off the oatmeal/butter mixture and stir in the sugar/egg mixture, then the flour/chocolate chip mixture.  Pour into a greased and floured 9 x 13 pan and bake at 350 for 35 minutes. 

Note:  if you prefer less oatmeal texture, you can substitute Bob's Red Mill Gluten Free Instant Oatmeal.

Also, for you wheat-OK followers, just leave out the xanthan gum and use regular oatmeal and flour.  No change in quantities.


Monday

Wonderful Waffles

I adapted this recipe from one that I received with my power bill -- you never know where you're going to find a good recipe!  I hope you've discovered Bob's Red Mill Gluten-Free Oats.  They are wonderful!  They work great in this recipe, and are a delicious hot breakfast cereal all by themselves.  They give these waffles a chewy texture, which is quite delightful. 

Wonderful Waffles

1-1/2 Cups gluten-free Four Flour Bean Mix
1 Cup gluten-free rolled oats
1 Tbsp baking powder
1 tsp cinnamon

Stir together in a large bowl.  Set aside.

2 eggs, separated
1-1/2 Cups milk
1/3 Cup canola oil
1 tsp vanilla
1 Tbsp brown sugar

In a medium bowl, beat egg whites until stiff peaks form;  set aside.  In another medium bowl beat egg yolks slightly; stir in milk, oil, vanilla and brown sugar.  Add egg yolk mixture to flour mixture; stir just until moistened.  Gently fold in egg whites.

Pour about 1/2 Cup batter onto grids of a preheated, lightly greased waffle baker (if it has a non-stick surface, it doesn't need to be greased).  Close lid.  Bake according to manufacturer's instructions.  When done, use a fork to lift waffle off grid.  Repeat with remaining batter. 

Makes 7 (6-1/2-inch) waffles.


I love sliced up bananas and light syrup on waffles, but use whatever you love best.


Friday

Valentine's Day Breakfast Cake/Valentine's Day Special Breakfast

There was a reason I decided on Valentine's Day Breakfast Cake as the item for the sweet course at the Sweetheart Tea-- I knew my daughters would immediately remember our Valentine's Day breakfasts when they were children as soon as they saw it.  Years ago when I was newly married, a neighbor down the street from my parent's house, Wanda Johnson (who had eight children), told me about their tradition of a special breakfast on Valentine's Day, and gave me this recipe.  I loved the idea and immediately implemented it.  Every Valentine's Day, no matter which day of the week it fell on, we had a special breakfast.  Even though I worked full-time outside the home while my kids were growing up, it was still possible to do this because the Breakfast Cake (their favorite part of the breakfast, of course) could be made the night before and refrigerated.  The next morning, I would just pop it in the oven to bake while I was preparing the other parts of breakfast, and it would fill the house with the most amazing aroma.  That was one morning that no one had to be coaxed out of bed!  It turned out to be one of our favorite family traditions.  Here's the menu:

Valentine's Day Special Breakfast

Fresh orange slices (twisty oranges, as the kids called them -- see picture)
Bacon or sausage (it's fun to make heart-shaped patties out of bulk sausage)
Scrambled eggs (if anyone wants my husband's delicious scrambled eggs recipe, leave me a comment)
Valentine's Day Breakfast Cake
Milk or juice


Valentine's Day Breakfast Cake

2-1/4 Cups GF Rice Powder Mix
1/2 tsp xanthan gum
1/2 Cup sugar
2 Tbsp baking powder
1/2 tsp salt
1/2 Cup shortening
1-1/3 Cups milk
2 eggs

Whisk together dry ingredients.  Cut in shortening.  Beat milk and egg together and add to flour/shortening mixture.  Stir together.  Pour into greased 9 x 13 pan.  Sprinkle topping over batter.  Cover with plastic wrap and refrigerate overnight, if desired.  To bake, remove plastic wrap and put in preheated 400 oven.  Cook for 25 minutes.  Let cool briefly.  Serve.  (For the non-GF version, just substitute 2-1/2 Cups regular flour in the batter and 1/2 Cup in the topping and eliminate the xanthan gum.)

Topping:

1/3 Cup brown or white rice flour
3/4 Cup granulated sugar
1 tsp ground cinnamon

Whisk together.  Cut in:

6 Tbsp butter.  Sprinkle over top of cake batter.


This is easy to do and a fun tradition.  I hope you'll try it!


Thursday

Chicken Salad Sandwich Filling/Sweetheart Tea

Last weekend I threw a Sweetheart Tea for all the women in my family (there were 17 of us!).  Originally it was supposed to be one year after our Teddy Bear Tea, which would have put it last November, but on calling around to my daughters, they all agreed that November/December was too busy, and why not schedule it for January/February when the weather is terrible and you're just dying for a party to go to to break up the monotony of winter.  I thought that sounded like a good idea, so we had it last Saturday, Feb. 5th, which was a little early for Valentine's Day (hence the theme) but I also wanted to work in a celebration of my mom's 93rd birthday on Feb. 4th.  Everyone was supposed to wear a Valentine shirt or Valentine colors, bring a card for my mom, and could bring their favorite doll if they wished.  My mom brought her only doll from her childhood (it's 81 years old) and told us about it.  I decorated with dolls from my childhood


and several of the granddaughters brought their dolls.  Here's Lauren showing us her doll:


For the menu, we had mini croissant chicken salad sandwichs (no gluten intolerance in this group) and Pasta Chicken Fruit Salad for the savory course, mini Poppy Seed Muffins and Applesauce Spice Raisin Muffins, and Orange-Cranberry Scones cut in heart shapes (recipe coming soon) for the scone course, and Valentine's Day Breakfast Cake (also coming soon) for the sweet course.  Here's a picture of the table with the above dishes on it:


I got the recipe for the sandwich filling from my daughter-in-law Julie (who also supplied the recipe for the previous post).  It would look and taste great on any of the GF breads sliced thin, lightly toasted, crusts cut off and cut into small squares or triangles (or hearts for a Sweetheart Tea :), especially the Soft White Bread

Chicken Salad Sandwich Filling

3 Cups cubed cooked chicken
1-1/2 Cups grapes, sliced in half
1/2 Cup sliced almonds or roughly chopped cashews
4-5 diced green onions
2 stalks celery, diced
8 fresh basil leaves, minced (if you can't find fresh basil leaves, substitute 1 tsp dried basil)
3-4 - 1 Cup mayonnaise
2 tsp fresh lemon juice
salt and pepper to taste
Havarti cheese
lettuce

Mix the mayonnaise, lemon juice, salt, pepper and basil together until well mixed.  Combine chicken, grapes, nuts, onions and celery.  Fold in mayonnaise mixture.  Refrigerate.  When making sandwiches, top filling with a thin slice of Havarti cheese and a lettuce leaf.  Serve immediately.

I decided to serve all the courses at once this year because at the Teddy Bear Tea I did each course separately, and everyone was too full by the time we got to the sweet course.  Here's everyone filling up their plates:


and our group shot:


A good time was had by all!

Saturday

Yummy Fall Salad

This is a wonderful recipe that I got from my daughter-in-law, Julie.  Whenever we have a family get together, it's always a potluck (there are 30 of us and there's no way I'm cooking for that many on a regular basis :) and she brought this salad to one of them.  Everyone loved it so much that she has to bring it to every party now.  As a side note, we usually serve the cashews in a little bowl separately rather than mixed in the salad since we have some family members who are allergic to nuts.  It's such a tasty salad, that it's good even without them, although better with!  Also, don't let the Fall in the name deter you from making this anytime -- I think it's called that because of the apples and pears which are usually considered fall fruits, but which you can find most of the year.  Be sure that the pears are perfectly ripe so that they'll be full of flavor.  You'll also notice that there are no amounts for the salad -- make as much as you need!  Serve the dressing separately too, letting each person put on the amount they want.  You'll find yourself hoping that there is some left over for later -- it's a wonderful dressing.  Enjoy!

Yummy Fall Salad

Salad:  Romaine lettuce, chopped
            Swiss cheese, cubed tiny
            Cashews
            Craisins
            Cubed apples
            Cubed pears
  
Dressing: 1/2 Cup sugar
                1/3 Cup lemon juice
                1/2 tsp dry mustard
                1 tsp salt
                2 tsp chopped onion
                2/3 Cup oil
                1 Tbsp poppy seeds

Combine sugar, lemon juice, dry mustard, salt and onion in blender; blend well.  While blender is running, add oil in a slow, steady stream;  blend until smooth.  Pulse or stir in poppy seeds.


Thursday

Applesauce Spice Raisin Muffins

I tried these muffins tonight for dinner and they turned out so well that I thought I'd share them with you.  I had made them before but hadn't really liked the texture, so I made some alterations and they came out just right.  You could serve these to guests and they would never guess that they're gluten free.

Applesauce Spice Raisin Muffins

In large bowl, add and combine well:
2 eggs
1/3 Cup brown sugar
1/2 Cup oil
1 Cup applesauce (preferably unsweetened)
1/2 Cup raisins

In a smaller bowl, combine well:
1-3/4 Cups gluten-free Four Flour Bean Mix
1/2 tsp xanthan gum
1 tsp baking powder
1 tsp baking soda
1/4 tsp salt
1/2 tsp ground cinnamon
1/2 tsp ground nutmeg
1/8 tsp ground allspice

Preheat oven to 400.  Grease 12 medium muffin tins.  Combine wet and dry mixtures together until mixed.  Spoon into prepared pan.  Bake for 20-25 minutes.  Remove from pan and cool on rack.  Makes 12 muffins.


Monday

Slow Cooker Coq Au Vin

This is a recipe I got on bhg.com (Better Homes and Gardens website).  I'm always looking for new recipes using my slow cooker, and this one sounded good to me, so I tried it.  It turned out scrumptious and made 4 generous servings.  If you're like me and don't drink and therefore have no experience with liquor stores, don't panic when you get to the "dry red wine" ingredient.  I recently discovered that you can buy red and white and Marsala wine for cooking in the grocery store, on the same shelf as the vinegars!  I like the flavor that wine imparts to food, and since all the alcohol cooks out, that's all you're left with!  Perfect!

Slow Cooker Coq Au Vin (that's French for Chicken with Wine :)

3 pounds chicken thighs, skinned
1 envelope beefy onion soup mix
2 Cups quartered fresh mushrooms
1-1/2 Cups frozen small whole onions (I didn't have any, so I just quartered a small onion and threw it in)
3 medium carrots, cut into 3-1/2 inch sticks
1/2 Cup dry red wine
Hot cooked mashed potatoes (optional)

Brown chicken thighs in a hot skillet with a small amount of oil.  Remove to paper towels and let drain.  Place chicken thighs in bottom of slow cooker.  Sprinkle with the dry soup mix.  Add mushrooms, onions, and carrots.  Pour wine over all.  Cover and cook on low for 5-6 hours or on high for 2-1/2 to 3 hours.  If desired, serve with mashed potatoes and sprinkle with parsley.


We're trying to eat more vegetables, so I added some steamed broccoli too.


Tuesday

Chicken Chowder

I don't know what the weather is like where you live, but it has been cold where I live!  Days (and nights) like this just cry out for hot homemade soup, don't you think?  This is a recipe that I concocted out of about three other recipes.  I thought it turned out well and hope you'll enjoy it too.  It makes enough for 6-8 people.

Chicken Chowder

2 Tbsp vegetable oil
1-1/2 lbs potatoes, scrubbed and cut into cubes (about 3 Cups)
1 Cup chopped onion (about 1/2 large)
1 Cup chopped celery (about 3 medium stalks)
3/4 lb cooked, cubed chicken (about 2 Cups)
1/2 Cup dehydrated potato flakes OR 3 Tbsp rice flour
2 tsp instant minced onion
1/2 tsp salt
1/8 tsp garlic powder
1 Tbsp parsley flakes
2 cans Swanson chicken broth
2 Cups frozen corn, thawed
1 Cup half-and-half
1/2 Cup cooked, chopped bacon (about 6 slices) (optional)
Salt and pepper to taste

Heat the oil in a large skillet over medium-high heat.  Add the potatoes, onion, and celery.  Cook, stirring occasionally, until the vegetables are softened, about 10 minutes.  If you don't have cooked chicken on hand and are using raw, add the raw cubed chicken along with the vegetables and cook it all together.  The chicken will be done about the same time as the vegetables get softened.  If using previously cooked chicken, add it after the vegetables have softened.

Sprinkle the potato flakes or rice flour (or regular flour if you're gluten tolerant) over the chicken and vegetables, mixing in well.  In a small bowl, mix together the instant minced onion, salt, garlic powder and parley flakes.  Add to the chicken/vegetable mix.  Add broth, corn, half-and-half, and bacon, if using.  Simmer over medium-low heat until the flavors have blended and the soup is thickened slightly, about 20-25 minutes.  Add salt and pepper to taste.  Serve.


Stay warm!


Friday

Hot Artichoke and Spinach Dip

This is a delish hot dip that I made for our annual Christmas Eve family dinner and festivities.  I had had the recipe for a long time (I got it years ago from my beautiful niece Ashley), but for some reason had never gotten around to making it.  However, I happened to have all the ingredients on hand and needed a dip, so I tried it.  I must warn you that it's totally addicting.  So yummy, and the leftovers (if there are any) are even good cold.  Hot is even better, though, especially on a cold night.  It's great on rice crackers, or if you're feeling extra ambitious, you can cut up a skinny loaf of GF French Bread into little rounds, brush both sides with a little olive oil, put them on a cookie sheet and pop them under your broiler for just a minute or two until they're toasted.  Then turn them over and toast the other side.  Warning:  do not take your eyes off them for a second!  They're super easy to burn (I speak from sad experience). 

Hot Artichoke and Spinach Dip

1 (8 ounce) package cream cheese, softened
1/4 Cup mayonnaise
1/4 Cup grated Parmesan cheese
1/4 Cup grated Romano cheese
1 clove garlic, peeled and minced
1/2 tsp dried basil
1/4 tsp garlic salt
Salt and pepper to taste
1 (14 ounce) can artichoke hearts, drained and chopped
1/2 Cup frozen chopped spinach, thawed and drained (or you can quickly cook up some fresh spinach, drain, measure out a half cup and chop it)
1/4 Cup shredded mozzarella cheese

In a medium bowl, mix together cream cheese, mayonnaise, Parmesan cheese, Romano cheese, garlic, basil, garlic salt, salt and pepper.  Gently stir in chopped artichoke hearts and spinach.  Transfer mexture to a small lightly greased baking dish.  Bake in a preheated 350 oven for 25 minutes, until bubbly and lightly browned.  Serve immediately.


Hot, cheesy yumminess!  And hey, you can count two veggies for the day :).


Wednesday

Penne Rustica

I do not know what happened to December.  No way did I intend to not do one post!  But there you have it.  I hope your holiday was wonderful.  We got what we wanted -- a new grandbaby on December 5th!  I spent a couple weeks helping out, and then one frenzied week trying to get ready for Christmas, and then one collapsed week recovering from the frenzied week, and now, somehow, it's January 5th.  By the way, I read in the January issue of Better Homes and Gardens (page 119 if you don't believe me) that "January 5 is the most stressful day of the year, according to a British survey of 2,000 people."  Makes you wonder about British surveys, doesn't it?  Somehow, I don't think I'd necessarily pick January 5th as an overwhelmingly stressful day -- I mean, why not the 3rd or the 10th?  I'm just sayin'.  Sooo, back to Penne Rustica.  I may not have been blogging in December, but I'll tell you what, I was eating!  And I ate some great stuff, including this recipe, which I had at a party and immediately asked for the recipe.  The party was on December 19th and I've already made it twice since then, that's how yummy it is.  It is not, however, low calorie, so if you've made a New Year's resolution to lose weight, I'd suggest skipping this recipe until Valentine's Day or you give up on the resolution, whichever comes first :).  I picked Valentine's Day because it would make a very romantic dinner entree.  Frankly, I don't think I can wait that long!

Penne Rustica

Gratinata Sauce:
1 tsp butter
1 tsp minced garlic
1/2 tsp dried rosemary
1/2 Cup Marsala cooking wine (you can find this in most grocery stores by the vinegars)
1/2 tsp Dijon mustard
1/2 tsp salt
1/8 tsp cayenne pepper
4 Cups heavy cream (I told you it wasn't low calorie)

Saute butter, garlic and rosemary together until garlic begins to brown.  Add Marsala wine, bring to simmer and reduce by 1/3.  Add remaining ingredients, bring back to simmer and reduce by 1/2, stirring often.  Be careful not to scorch.  Set aside.

1 pkg (16 oz) Tinkyada Brown Rice Penne, cooked, rinsed, and drained
2 - 4 strips bacon, cooked until crisp, cooled and chopped
3/4 stick (6 Tbsp) butter
3 chicken breasts, cut into bite-size pieces
1/2 - 1 lb large shrimp, peeled, deveined, tails off, cut into bite-size pieces
Salt and pepper to taste
Gratinata Sauce
1/2 Cup fresh grated parmesan cheese, divided
4 sun-dried tomato halves (the dehydrated kind, not in oil -- you don't really need more oil ;), diced
Paprika

Cook the bacon.  Remove from pan and clean grease from pan.  Saute chicken pieces in butter until cooked through.  Add shrimp and cook just until pink.  Add salt, pepper, Gratinata Sauce and 1/4 Cup of the grated parmesan cheese and simmer until thickened.  In large bowl, combine shrimp and chicken mixture with cooked pasta, chopped bacon and diced sun-dried tomatoes.  Place in 9 x 13 casserole dish.  Top with remaining 1/4 Cup parmesan cheese and sprinkle lightly with paprika.  Bake at 475 for 10-15 minutes.  Serve immediately.  


A 9x13 casserole feeds 8-12 people, since it's so rich.  I have found that trying to reheat leftovers, either in the oven or in the microwave, causes the cream to separate.  I just mop up the resulting oil with a paper towel and figure I'm now eating a lower fat version that still tastes great.  If you discover a way to reheat it without the separation, please let me know and I'll add it to this post!   

Tuesday

Favorite Apple Pie

This is the apple pie recipe that I've been making for the past 40 years.  It's from a paperback cookbook that I was given at my wedding shower over 41 years ago called Farm Journal's Complete Pie Cookbook, Popular Edition.  I don't know if it's still available or not, but it's 291 pages of pie recipes.  My book has been used so much that it's now held together with a rubber band :).  The only difference from the original is that I now use rice flour instead of regular flour, and of course my pastry is gluten free. 

Favorite Apple Pie (makes one 9" pie)

Pastry for a 2-crust pie (I used this recipe)
3/4 to 1 Cup sugar, depending on tartness of apples
2 Tbsp  rice flour
1/2 to 1 tsp cinnamon
1/8 tsp nutmeg
1/4 tsp salt
6 to 7 Cups sliced peeled apples (I like to use equal amounts of Granny Smith and Golden Delicious apples)
2 Tbsp butter or margarine (optional)

Combine sugar, flour, cinnamon, nutmeg and salt.  Slice apples 1/4" thick.  Mix sugar mixture and apples.  Heap in pastry-lined 9" pie pan.  Dot with butter if desired.  Adjust top crust and flute edges; cut vents.

Bake in hot oven (425) 50 to 60 minutes, or until crust is browned and apples are tender.


I brushed the top crust with beaten egg white and then dusted it with granulated sugar.  This is the first apple pie I've made using the cream cheese pie crust recipe, and the edge seemed to get brown ahead of the top.  I'm thinking that next time I'll adjust the temperature to 400 in hopes of it browning more evenly.  I'll be making another one this month sometime, and if it works better, I'll revise the instructions above.


Monday

Gail's Green Beans

I made the yummiest green beans for Thanksgiving dinner!  I got the idea from my friend Gail who is one of the most creative cooks on the planet.  She's always up to something wonderful in her kitchen, and doesn't use recipes much, preferring to create as she goes.  Anyway, she brought these beans to a dinner we both attended and they were so wonderful I had to ask her how she did them.  No recipe, of course, but she told me what she had put in, so I did the same for Thanksgiving, and voila!  They were as easy and delicious as Gail said they'd be! 

Gail's Green Beans

Enough fresh green beans for 3-4 people (about 1 lb)
1 Tbsp butter
2 green onions, sliced
6 medium sized fresh mushrooms, cut in half and then sliced
2 slices bacon, fried crisp and chopped

Cook green beans in boiling water until tender-crisp.  Drain.  While beans are cooking, melt butter in large fry pan; saute onions and mushrooms in butter until cooked.  Add cooked chopped bacon and drained green beans and cook together briefly, stirring well.  Serve immediately. 


Tuesday

Chicken Pot Pie

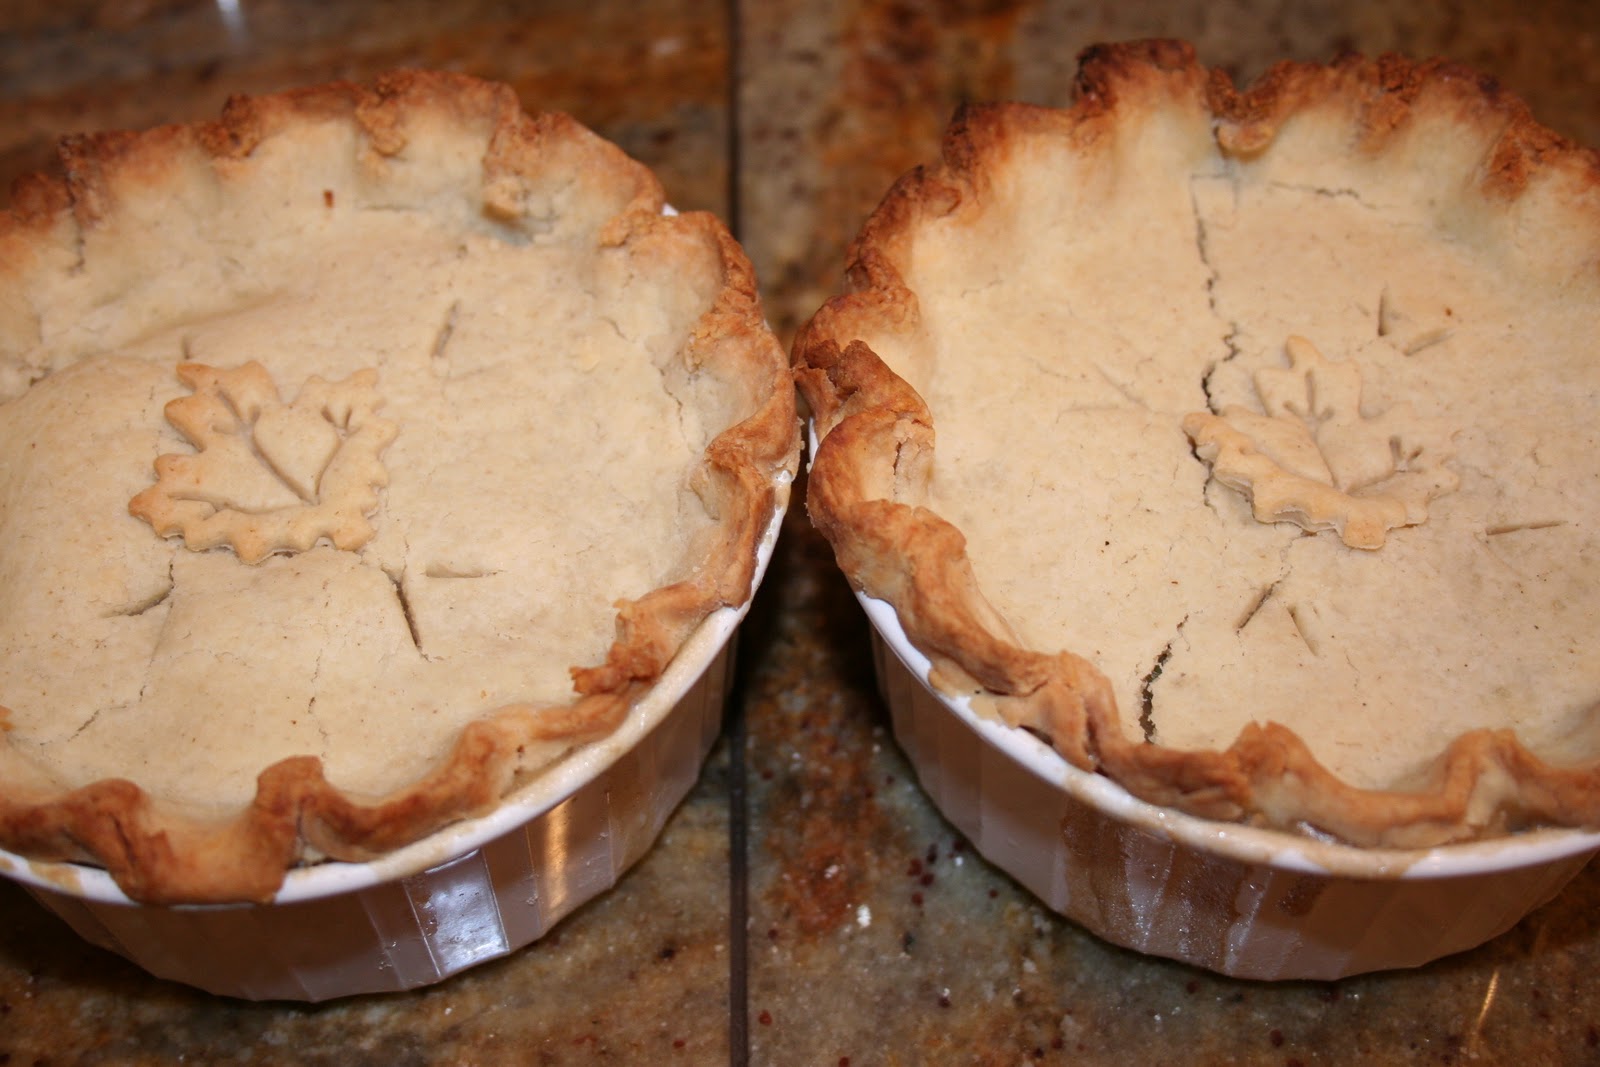
This is a bonus recipe that combines the last two posts into one!  If you've made the Chicken and Dumplings, you're set to go.  I made this in individual sized ramekins, although it would work fine in a regular pie plate if you're feeding a family or don't have ramekins.  I decided I wanted to change up the chicken stew a little, so I just sauteed some sliced fresh mushrooms in a little butter and added some frozen peas to the mushrooms right at the end to thaw them, then stirred them into the chicken stew.  (I didn't use the dumplings at all.)  I've always thought that a bottom and top crust on chicken pot pie was too much, so I just ladled the jazzed up stew into the bowls...


and then topped them with the crust (using yesterday's recipe, which makes 4 tops).  If you like lots of crust, feel free to line the bottom and top -- I'll never tell!


Then I baked them in a 375 oven until the tops got browned.


They were yummy!  Here's a picture of one that's been cut into so you can see the flakiness of the crust.


These is also a great way to use up leftover turkey, vegetables and gravy from Thanksgiving dinner.  Just combine what you've got, add what you like, and top it with crust!  A hit every time!

Monday

Pie Crust

Up until now, I've been using Donna Jo's Dream Pastry from Bette Hagman's book More from the Gluten-Free Gourmet for my pie crust.  It is a great recipe, good-tasting, tender and flaky, but the dough is very delicate and hard to handle -- I always had to do a lot of patching once I got it into the pan because it broke apart so much in the transfer from surface to pie plate.  Recently my daughter-in-law got me a new GF cookbook called Life Tastes Good Again by Kirsti Kirkland and Betsy Thomas.  It had an intriguing pie crust recipe in it that I just had to try.  In the book it's called Best Gluten Free Pie Crust, although they explain that it's original name is "The Best Pie Crust You've Ever Eaten Because It's Amber's Recipe and She's Perfect," which made me laugh.  The biggest difference in this crust is that there's no water added, which makes it way easier to handle.  In fact, it handles just like regular pie crust!  And it turns out tender and flaky.  The flavor is a tad different, probably because of the cream cheese, but still very good.  Because of the ease in handling, this has become my new favorite.

Pie Crust

1-1/2 Cups Bob's Red Mill all-purpose GF flour
1/2 Cup gluten-free flour mix (I usually use basic or featherlight)
1/2 tsp xanthan gum
2 Tbsp sugar
1/2 tsp salt
6 oz cream cheese, softened
1 Cup real butter, softened

Whisk together flours, xanthan gum, sugar and salt.  Set aside.  Use an electric mixer on low speed to mix the cream cheese and butter together.  Add the dry ingredients and mix just until the dough clumps together.  Divide the dough into 2 discs, wrap in plastic wrap, and refrigerate for 30-60 minutes.

Sprinkle some GF mix on a clean surface.  Roll each disc into a circle that is 1/8 inch thick.  Transfer to pie pan.  With your fingertips, pinch the top of the dough to make ridges all around the top of the crust or just press it all around with the back of a fork.  Chill 20 minutes before filling.  Fill with your favorite pie filling and bake as that pie recipe directs.  Makes one double crust or two single crusts.

If pre-baking:  Preheat oven to 375.  Prick the bottom of crust all over with a fork.  Line the inside of crust with aluminum foil.  Fill it with pie weights, uncooked rice, or beans.

Bake for about 25 minutes or until very lightly browned.  Lift foil and weights out of the shell and bake until browned, 10-15 minutes more, checking frequently to prevent over-baking.  Remove from the oven and cool completely before adding filling.


If you would like to have the Bette Hagman recipe, leave me a comment and I'll put it in a separate post.

Thursday

Chicken and Dumplings

OK, you're finally getting my all-time favorite, ultimate comfort food recipe.  Be warned, however, that it is also labor-intensive, but totally worth it.  For the ultimate experience, you'll want to pay attention to the following, in order of importance:
1.  A cold day, preferably snowing or storming (this is definitely not a warm-weather dish).
2.  A day when you have a block of time with no deadlines and no stress, so you can just enjoy being in the kitchen (it turns out better with the love flowing).
3.  Make sure you have the ingredients you need on hand so you don't have to run to the store in the midst of making it (see #1).
4.  An evening coming up (not necessarily the day you make it) with family or close friends invited who love honest, simple, delicious homemade food and will appreciate your efforts (optional if you hate entertaining).

I have made this recipe for years and given it out numerous times.  I adapted it the first time (pre-GF) from a recipe I found in a magazine. That version was more casserole-y, with the chicken still on the bone in pieces, which I thought was weird because it was so hard and messy to eat.  So I changed that and a few other things that I'll explain later.  It became an immediate family favorite, and is usually what we have for Christmas Eve dinner (made a day or two in advance, when I can manage it--thank goodness it keeps well).  When we found out about Ron's allergy to wheat, I was determined to adapt it again so that we could continue to enjoy it -- it was impossible to imagine our lives without ever having chicken and dumplings again!  It took a few tries, at least for the dumplings, before it was back to its previous status as #1 fav.  I hope it becomes one of your family favorites as well. 

Chicken and Dumplings (makes enough for 12 generous servings)

5 lbs chicken breasts and thighs, skinned, or 2 whole chickens cut into pieces
6 Cups thickly sliced carrots
6 Cups thickly chopped onions
3 Cups thickly sliced celery
13 Cups water
6 cans Swanson's chicken broth
Bouquet garni:  3 Tbsp dried parsley, 1 large bay leaf, 1 tsp thyme, 1 tsp rosemary, 1-1/2 tsp crushed peppercorns or coarse ground pepper.  The traditional way to make a bouquet garni is to put the ingredients in a couple layers of cheesecloth, and tie it with string.  I rarely have cheesecloth on hand, so I use a large spice ball.  The picture below shows 2 spice balls with a teaspoon in the foreground so you can get an idea of the size.  I most often use the one on the right, as you can tell from its beat-up appearance :).  Incidentally, large spice balls like these also work great for the spices used in spiced cider (I'll be sharing my favorite recipe for that soon!)


Cook chicken in 10 cups of the water.  Boil, skimming often, until chicken is cooked through.  Remove chicken from water and keep broth.  If you use whole chickens, you will, of course, have to remove the meat from the bones, which is more work.  Using skinned boneless chicken breasts and thighs speeds things along a little.  After it cools, cut into bite-sized chunks.

Cook the veggies in 3 Cups water, canned chicken broth and bouquet garni.  When veggies are done, remove bouquet garni and vegetables from broth.  Keep broth

While the meat and vegetables are cooking, mix up the dumplings:

6 Tbsp shortening
2 eggs
2/3 Cup buttermilk or sour milk
1 Cup rice flour
2/3 Cup potato starch flour
4 tsp baking powder
1 tsp baking soda
1 tsp salt
2-3 Tbsp dried parsley

Beat the shortening and egg together.  Whisk the dry ingredients together.  Stir in the buttermilk alternately with the dry ingredients.  Do not overbeat.  This will be a fairly stiff dough.  Set aside.

3 cubes (1-1/2 Cups) butter
2 Cups brown or white rice flour
1 Tbsp salt
2 tsp ground pepper

In very large stock pot, melt butter.  Add flour, salt and pepper and cook for 2 minutes.  Pour in 16 cups of the reserved veggie and chicken broth.  If you need additional, add water to make the 16 cups.  Stir until thickened.  Bring to a boil; lower heat until gravy is at a good simmer that is producing steam.  Drop dumplings by heaping tablespoonfuls into hot gravy.  Only put in as many as can fit comfortably, not touching each other.  Cover with tight lid and steam for 10 minutes.  Do not lift the lid while cooking dumplings.  It is the steam that cooks the dumplings.  You can test for doneness in the normal way - with a wooden toothpick.  They will be coated in gravy, but should be done in the center like biscuits.  Remove dumplings from broth and put in your next batch.  Keep cooked dumplings warm on an oven-proof plate in the oven.


Here's what they look like when done.  They aren't real attractive, but it won't matter.  Keep reading!

When all the dumplings are cooked, add the veggies and cut-up chicken back into the gravy, stirring well.  Lower heat. 

To serve, put a dumpling in the bottom of a bowl and ladle the chicken stew on top. 

Note:  Don't be tempted to put the veggies and chicken into the gravy before cooking the dumplings.  The veggies and meat will sink to the bottom and burn while the dumplings are cooking. Getting the gravy hot enough to produce the steam necessary to cook the dumplings without burning on the bottom is the trickiest part.  If you discover that the gravy has stuck and burned some on the bottom, don't panic.  Just transfer the gravy into another large pot, without scraping the burnt part with it, then add your vegetables and meat into the gravy and reheat at a low temperature.  The veggies and meat are usually still pretty warm and the gravy is hot, so it doesn't take long at all to get it to eating temperature.


There it is -- total comfort in a bowl.  And as an added bonus, your house will smell divine! 

For my gluten-eating followers, just use regular flour instead of the rice flour in the soup part, and here's the original recipe for the dumplings:

3 Cups flour
1-1/2 Tbsp baking powder
1-1/2 tsp salt
3 eggs, lightly beaten
15 Tbsp milk
2-3 Tbsp dried parsley

Mix dry ingredients and parsley in a bowl.  Mix milk and eggs together.  Add to dry ingredients and mix until just blended.  Dough will be sticky.  Proceed as directed above.

Wednesday

Pumpkin Cream Cheese Spread

This easy to make spread is great on the pumpkin muffins, and pancakes, and waffles, and anything else you want to spread it on.  Mmmmmm.  Thanks, Better Homes and Gardens!

Pumpkin Cream Cheese Spread

1 8-ounce package cream cheese, softened
1/2 Cup canned pumpkin
1/4 Cup sugar
3/4 tsp pumpkin pie spice
1/2 tsp vanilla

Beat all ingredients in a medium mixing bowl with an electric mixer on medium speed until smooth.  Cover and refrigerate for at least 1 hour or up to 24 hours.  Makes 1-1/2 Cups.


With this and this in your refrigerator, you can forget about buying those expensive cream cheese spreads at the supermarket! 


Tuesday

Pumpkin Muffins

We were up in the mountains over the weekend and I decided to try to adapt a recipe I've had for awhile for Pumpkin Muffins.  Anything pumpkin seems appropriate this time of year, and it was snowing beautifully -- you know, the big fat flakes straight down kind of snow that automatically puts you in the mood for the holidays (and baking, in my case :).  So maybe it was just karma, because first-try adaptations rarely turn out well, or maybe it was the snow, but I have a new favorite muffin, they turned out that good.  So good, in fact, that I had to make a second batch today because I just can't get enough of them.  And, oh yeah, I had the idea to try adding some chocolate chips to this batch, and....woohoo, they got even better!  Not as healthy, maybe, but hey, it's the holidays!  (If you want healthy, try adding some raisins or nuts, which is what's going into my next batch.)  So here you go -- don't blame me if you get addicted!

Pumpkin Muffins

1-1/3 Cups gluten-free rice flour mix
3/4 Cup Bob's Red Mill All-Purpose Baking Flour or gluten-free four flour bean mix
1/3 Cup sugar
1/2 tsp xanthan gum
1-1/2 tsp baking powder
1 rounded tsp ground cinnamon
1/2 tsp baking soda
1/2 tsp salt
2 slightly beaten eggs
1 Cup canned pumpkin
1/2 Cup milk
2 Tbsp oil
1/2 tsp finely shredded orange peel
1/4 Cup orange juice
raisins, chopped nuts, chocolate chips, your favorite add-in (optional)

Whisk all dry ingredients together in a large bowl.  In another bowl combine the eggs, pumpkin, milk, oil, orange peel and orange juice.  Add to the flour mixture all at once (along with any add-ins) and stir until moistened (batter should be lumpy).  Spray twelve 2-1/2 inch muffin cups if they have a non-stick coating, or grease regular muffin tins.  Spoon batter into the prepared muffin cups, dividing evenly.  Bake at 400 for 15 to 20 minutes or until the muffins are light brown.  Cool in muffin cups for 5 minutes; remove and serve. 


This is a picture of my last plain one, and one of the new ones with the chocolate chips.  And what is that in the container to the side, you ask?  Check tomorrow for a new spread recipe that's perfect on these!


Thursday

Cranberry Fruit Nutbread

This is my favorite Christmas tea bread that I told you I'd be sharing two posts ago.  Better sooner than later, I guess!   I make dozens of loaves of this every holiday season to give to neighbors, friends, co-workers, etc.  Below the picture are some shortcuts you can take to speed things along if you're really cranking them out in production.  I also make them in different sizes of loaves -- a big loaf for a family, a tiny one for a single person -- you get the picture.  I also like to use the single-use pans they sell at the supermarket.  Some of them even come with little plastic lids that you pop on after they've cooled, and you don't have the stress of wondering if the loaf will come out of the pan cleanly -- you just leave them in the pan!  If you're really pressed for time, you can just stick on a bow or tie a pretty ribbon around the pan and lid, attach a tag, and you're good to go.  I usually wrap the whole shootin' match in foil (shiny side out) and then tie on the ribbon and tag.  So here we go:

Cranberry Fruit Nutbread

2 Cups gluten-free mix (I usually use the featherlight mix)
1 Cup sugar
1/2 tsp xanthan gum
1-1/2 tsp baking powder
1 tsp salt
1/2 tsp baking soda
1/4 Cup shortening
1 tsp grated orange peel
3/4 Cup orange juice
1 well beaten egg
1 Cup fresh cranberries
1/2 Cup chopped nuts (optional)

Whisk the dry ingredients together in a bowl.  Cut in shortening.  Combine the orange peel, orange juice and egg in a separate bowl.  Add to the dry ingredients and mix.  Fold in cranberries and nuts.  Turn into greased loaf pans.  Bake at 350 for 40 to 60 minutes, depending on size of loaf pans being used.  Cool thoroughly.  Best if wrapped and stored overnight before cutting.

You can double, triple, or even quadruple this batch to make more loaves without any loss of texture or yumminess. 


The loaf pictured is a tiny one, in case you're wondering why the cranberries look so big :).  If you're making a bunch of these, here's some tricks that will save you some time, but won't affect the quality of the loaf:

Rather than grating fresh orange peel, you can buy bottles of dried grated orange peel (in the spice section).  Just add it to the orange juice before you start putting together the dry ingredients so that it can soften and plump up.  Also, for the orange juice, instead of squeezing fresh orange juice, or even reconstituting frozen orange juice, just buy ready-to-go orange juice in the cartons.  I like to get the kind with the most pulp, so that it's most like fresh squeezed.  If you use the chopped nuts, you can buy them chopped up, rather than having to chop them yourself, or if you have whole ones, use a food processor to chop a quantity of them rather than doing it by hand.  Also, they don't have to be chopped real small.  Bigger chunks look more attractive and taste better, and still slice fine once the loaf has cooled.  In the picture is the orange juice I use, the little bottle of dried, grated orange peel, and the little loaf  pans with lids that I mentioned at the top.


For those of you who tolerate wheat -- substitute regular flour for the gluten-free flour and leave out the xanthan gum.